


ASP .NET Core Website with VS 2019 IDE
This article gives a brief description on how to create an ASP .NET Core Website with the use of Microsoft Visual Studio 2019
Welcome back Readers, here this article we’ll learn about, how to create a Website using Microsoft Visual Studio IDE (note: it is now the Text Editor Visual Studio Code). We’re going to use Visual Studio 2019 Community Edition for Windows.
So, let’s get started by opening Microsoft visual studio. And if you haven’t downloaded the software then click here to setup the development environment. I’ve enabled the Dark theme, why cause I like it 😀, you’re free to select a theme of your choice.
- After opening Visual Studio, click on Create a New Project

- On the next screen, Search for “Web” in the top given search bar and then select ASP.NET Core Web Application, then simply click on Next

- Give your project a name, then click on Next
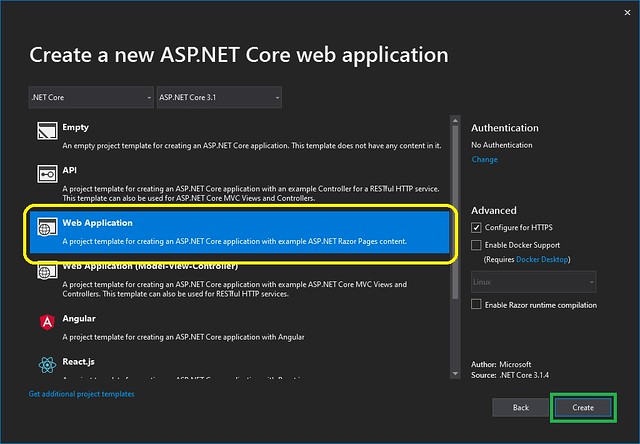
- On the next screen, Keep the setting s as it as and select Web Application from the choices, then again click on Next.

- You’ll see something similar to the below image, the theme might be different. 😅

- Let’s understand the directory structure a bit, that what folder contains what files:
- wwwroot: It is the folder which contains static files for the website, which contains those files which doesn’t changes much.
- Pages: It contains files that would be used to render the pages dynamically.

- Now let’s run the application, by pressing the ‘F5’ key or simply click on the “IIS Express” Button on the top
- Great it’s working now, so stop the application from Visual studio and then navigate to the file named: Index.cshtml present in the Pages Folder from the Solution Explorer.

- Now let’s change some text in this file (Note: I’ve activated the Word wrap in my demo, press, “ctrl+E+W”):
- <H1>: Test Web Application
- <p>: This application is made from Visual Studio 2019 Community Edition.

- Now let’s run the application, but this time we’ll do it without debugging, press “ctrl+F5”. Or we can simply go to the Debug Menu> Start without debugging.


- Let’s see the output now

- Now let’s change the footer itself and add year as the Dynamic year using JavaScript as we don’t want to change the year every year. Navigate to the file “_Layout.cshtml” present in Shared> Pages from the Visual Studio.

- Place the below code in place of 2020:
- “ @DateTime.Now.Year ”

- This will apply a dynamic date according to the current year at the system of the Client/ User.
