


How to enable Identity Core with Empty Template in ASP.NET Core MVC 3.1
Enable Identity Core with Empty Template in ASP.NET Core MVC 3.1
Today I will explain how to enable identity core in ASP.NET Core MVC application. This article will help you to understand the steps for enabling identity and working with security in asp.net core. Here is the complete code.
What is ASP.NET Core Identity?
ASP.NET Core Identity is a membership system. It allows us to create, read, update, and delete user accounts. It supports account confirmation, authentication, authorization, password recovery, two-factor authentication with SMS. It also supports external login providers like Microsoft, Facebook, and Google, etc.
Step 1
Startup Visual Studio 2019. Now click on create a new project and Choose ASP.NET Core Web Application and click on “Next”
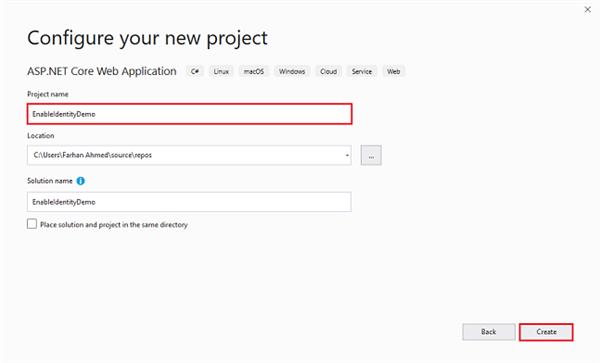
After clicking next, another wizard will open. Under the project name, give a meaningful name to your project and click on create.
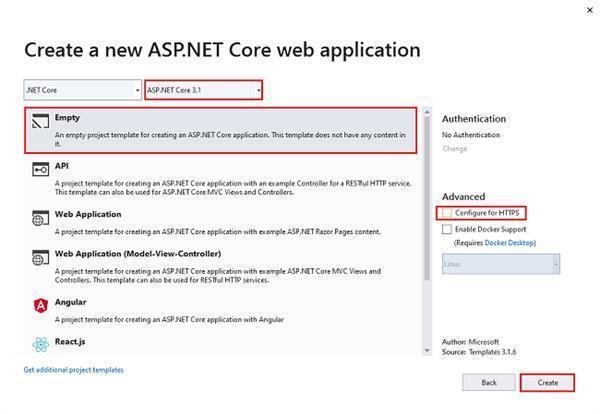
That will open up another new wizard select ASP.Net Core 3.1 from the dropdown. If not, select default. Choose an empty template and click on create which will create your first ASP.Net Core Application.
Step 2
Click on tools, select NuGet Package manager, then click on manage NuGet package for a solution. Now click on browse tab then search for the following package and install them.
- Microsoft.EntityFrameworkCore
- Microsoft.EntityFrameworkCore.SqlServer
- Microsoft.EntityFrameworkCore.Relational
- Microsoft.EntityFrameworkCore.Tools
- Microsoft.AspNetCore.Identity.EntityFrameworkCore
Step 3
Now create a Models folder under your project and create ApplicationDbContext, Employee, and Department class. Now inherit ApplicationDbContext class from IdentityDbContext.
using Microsoft.AspNetCore.Identity.EntityFrameworkCore;
using Microsoft.EntityFrameworkCore;

namespace EnableIdentityDemo.Models
{
    public class ApplicationDbContext : IdentityDbContext
    {
        public ApplicationDbContext(DbContextOptions<ApplicationDbContext> options)
            : base(options)
        {

        }

        public DbSet<Employee> Employees { get; set; }
        public DbSet<Department> Departments { get; set; }
    }
}
using System.ComponentModel.DataAnnotations;

namespace EnableIdentityDemo.Models
{
    public class Employee
    {
        public int Id { get; set; }

        [Required(ErrorMessage = "Please enter first name")]
        [Display(Name = "First name")]
        [StringLength(100)]
        public string FirstName { get; set; }

        [Required(ErrorMessage = "Please enter last name")]
        [Display(Name = "Last name")]
        [StringLength(100)]
        public string LastName { get; set; }

        [Required(ErrorMessage = "Please enter age")]
        public int Age { get; set; }

        [Required(ErrorMessage = "Please enter position")]
        [StringLength(100)]
        public string Position { get; set; }

        [Required(ErrorMessage = "Please enter office")]
        [StringLength(100)]
        public string Office { get; set; }

        [Required(ErrorMessage = "Please enter salary")]
        public int Salary { get; set; }

        [Required(ErrorMessage = "Please choose department name")]
        [Display(Name = "Department")]
        public int DepartmentId { get; set; }

        public Department Department { get; set; }
    }
}
using System.ComponentModel.DataAnnotations;

namespace EnableIdentityDemo.Models
{
    public class Department
    {
        [Key]
        public int Id { get; set; }

        [Required(ErrorMessage = "Please enter department name")]
        [Display(Name = "Department")]
        [StringLength(100)]
        public string DepartmentName { get; set; }
    }
}
Step 4
Now open appsettings.json file and add and setup connect string.
{
  "Logging": {
    "LogLevel": {
      "Default": "Information",
      "Microsoft": "Warning",
      "Microsoft.Hosting.Lifetime": "Information"
    }
  },
  "AllowedHosts": "*",
  "ConnectionStrings": {
    "DefaultConnection": "server=(localdb)\\MSSQLLocalDb; database=SampleDB; Trusted_Connection=True"
  }
}
Step 5
Visual Studio 2019 generates program and startup classes. Now open the startup file and configure ASP.Net MVC Core Application development. Under app.UseEndpoints method just maps endpoints.MapControllerRoute. Add connection middleware and Addidentity Middleware in services.
using EnableIdentityDemo.Models;
using Microsoft.AspNetCore.Builder;
using Microsoft.AspNetCore.Hosting;
using Microsoft.AspNetCore.Identity;
using Microsoft.EntityFrameworkCore;
using Microsoft.Extensions.Configuration;
using Microsoft.Extensions.DependencyInjection;
using Microsoft.Extensions.Hosting;

namespace EnableIdentityDemo
{
    public class Startup
    {
        private readonly IConfiguration Configuration;

        public Startup(IConfiguration configuration)
        {
            Configuration = configuration;
        }

        public void ConfigureServices(IServiceCollection services)
        {

            //Add Connection Middleware
            services.AddDbContext<ApplicationDbContext>(
                options => options.UseSqlServer(this.Configuration.GetConnectionString("DefaultConnection")));

            //Configure Identity framework core
            services.AddIdentityCore<IdentityUser>(options => options.SignIn.RequireConfirmedAccount = true)
                 .AddEntityFrameworkStores<ApplicationDbContext>();

            //Add MVC Middleware
            services.AddControllersWithViews();
        }

        public void Configure(IApplicationBuilder app, IWebHostEnvironment env)
        {
            if (env.IsDevelopment())
            {
                app.UseDeveloperExceptionPage();
            }

            app.UseRouting();

            //Add Authentication and Authorization before route
            app.UseAuthentication();
            app.UseAuthorization();

            app.UseEndpoints(endpoints =>
            {
                endpoints.MapControllerRoute(
                    name: "default",
                    pattern: "{controller=Home}/{action=Index}/{id?}");
            });
        }
    }
}
AddIdentityCore
Adds and configures the identity system for the specified User type. Role services are not added by default.
Step 6
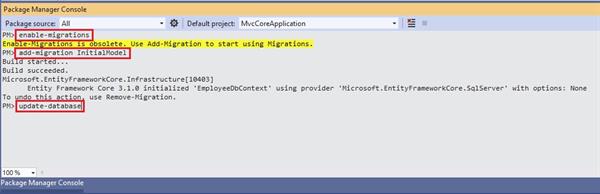
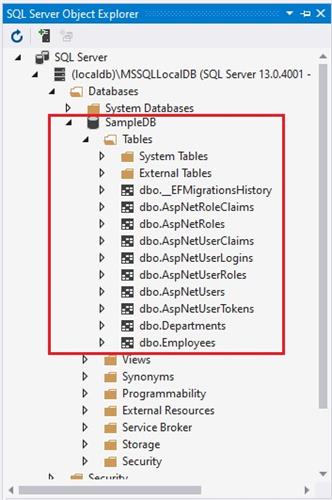
Now go to tools,r select NuGet package manager, then click on package manager console. It will bring the console window below in visual studio 2019. Now write the following commands to enable migration.
- enable-migrations
- add-migration InitialModel (add migration can be anything you wish to)
- update-database
Summary
In this article, I have explained how to enable an identity framework with an empty template in ASP.Net Core MVC 3.1. I hope it will be helpful.
