


How to encrypt Azure Virtual Machine Disks
What is encryption?
Encryption is converting the meaning full information into meaningless by adding some sequence of letters, number or symbols. The process of encryption uses some algorithm that has the key. The key is a part of the algorithm which uses the data to be encrypted and the same key can be used to be decrypted. There are two keys we generally use symmetric, where the same key is used for encryption and decryption, or asymmetric, where different keys are used.
Symmetric Key encryption
Advanced Encryption Standard (AES), RC4, DES, RC5, and RC6 algorithms use the symmetric key encryption that is typically faster than asymmetric key encryption and often used for securing a large amount of data stores because there is only one key to use data encryption and decryption both.
Asymmetric Key encryption
Popular asymmetric key encryption algorithm includes ElGamal, RSA, DSA, Elliptic curve techniques, PKCS. Asymmetric algorithms, only the private key member of the pair must be kept private and secure as its name suggests, the public key can be made available to anyone without compromising the encrypted data. Asymmetric key encryption algorithms are much slower than symmetric algorithms, and cannot be used to encrypt large amounts of data.
Azure Disk Encryption
There are two main encryption techniques to encrypt Azure Virtual Machines
- Storage Service Encryption (SSE)
- Azure Disk Encryption (ADE)
Storage Service Encryption: Storage Service Encryption is an encryption service that is used to encrypt data at rest. Azure Storage automatically encrypts the data before it stores to several storage services, including Azure Managed Disks. This is encryption is enabled by default and managed by Azure Storage administrator using 256-bit AES encryption.
Azure Disk Encryption: This encryption has to manage by Azure Virtual Machine owner. Azure Disk Encryption performs the encryption for the Windows VM disks and Linux VM Disks. These two techniques, BitLocker for Windows VMs and DM-Crypt for Linux VMs.
Azure data encryption(ADE) uses a combination of following types of symmetric and asymmetric keys
- Data Encryption Key (DEK): These are AES-256 bit symmetric keys used to encrypt data blocks. A single resource can be divided into multiple partitions. Then multiple DEKs are used to encrypt partitions.
- Key Encryption Key (KEK): These are the asymmetric keys used to encrypt the DEKs for an extra layer of security. Use of a Key Encryption Key that never leaves Key Vault allows the data encryption keys themselves to be encrypted and controlled.
Note: ADE does not support the encryption of Basic tier VMs.
Let’s start the Azure Disk Encryption on an Azure Windows VM.
In my earlier article, we already learned how to create Azure Virtual Machine if not then read the first article How To Create Azure Windows VM from Azure Portal.
Step1. Login into Azure Portal and go to Virtual Machine.

Step2. Click on Disks and see the Disk Encryption is not enabled. So you can click on the Encryption button on top.

Step3. Select OS Disk(You can select OS and data Disks but it depends on VM type that will support or not).For disk encryption, we required to Azure KeyVault. If you already have then selected it, otherwise create new(I will suggest creating new as we have to check access policy for VM disk encryption). To create keyVault, just click on “Create Key Vault and Keys” or you can go to all service and search the key vault and create.

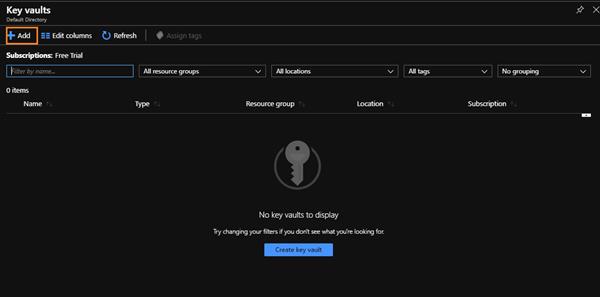
Step4: Click on the Add button.
Step5: Fill all fields and click on the “Next: Access Policy” button.

Step6: Check the “Azure Disk Encryption for volume encryption” checkbox and click to review and create a button.

Step7: Click on the Create button.

Step8: Go to Azure key vault that we have created and click on Keys => Generate/Import

Step9: Select Generate from the dropdown and give the name of the key then click on create button.

Step10: Come back to your Virtual Machine Disks option and select the key vault and key that we have created. Click on the select button.

Step11: Click on the “Save” button.

Step12: Click on the “Yes” button to save it.

Step13: Bingo, you can check the Encryption is enabled now.

Step14: Login to RDP and check the OS Disk has a lock icon as it shows it is encrypted.

Thank You.
