


Exploring @Input() and @Output() Decorator in Angular
Introduction
In this article, I am exploring very important two points related to Angular 2 + version, which the part of Parameter Decorator and these points are called
@Input and @Output decorators. Both are used to transform the data from one component to another component or you can say pass the different types of data from parent to child component and child to parent component. Or in a simple way transform/exchange data between two-component.
Project Structure of Angular 2 +
What are the new features in Angular 8
Let's explore each and every one by one.
@Input Decorator:
@Input is a decorator to mark a property as an input. @Input is used to define an input property to achieve component property binding.
@Inoput decorator is used to passing data (property binding) from parent to child component. The component property should be annotated with @Input decorator to act as input property.
Let's explore it practically.
I have created an angular application which is AngApp. And I have created two components. They are app components and student components. I will transfer the data from parent to child component using @Input decorator. I am assuming my, app-component is the parent component and student-component is the child component.
To make the parent-child relation, to keep the instance (selector of student component) of student component inside the template URL (app.component.html) of app component.
Open app.component.html: Inside this file, we keep an instance of student component like.
<div> <app-student></app-student></div>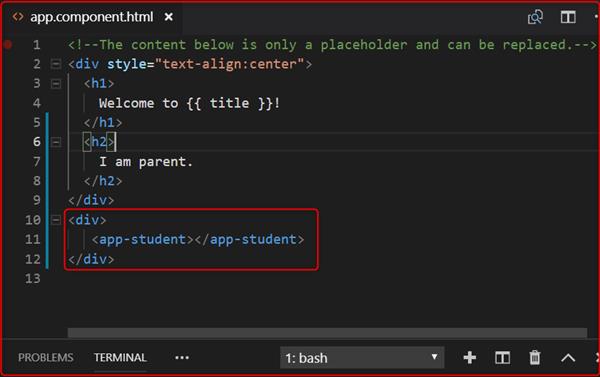
In the above image selected area is the child component.
Now, we want to send the message from parent to child component.
Let's open the parent component's .ts file (app.component.ts) and declare a variable inside AppComponent class to store the message and this message received by the child component.
myInputMessage:string ="I am the parent comppnent"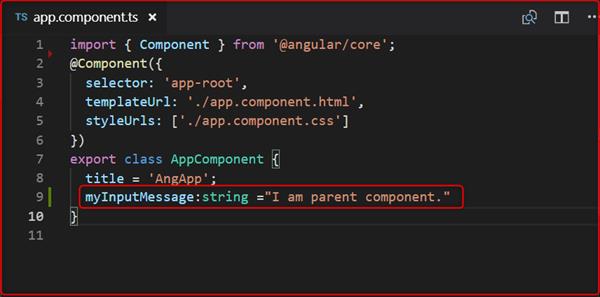
In the above image, we have declared a variable( myInputMessage) showing in the selected area.
Now, let's open parent component views (app.component.html) pass this variable inside child component instance which is passed inside parent component.like.
<div>
<app-student [myinputMsg]="myInputMessage"></app-student>
</div>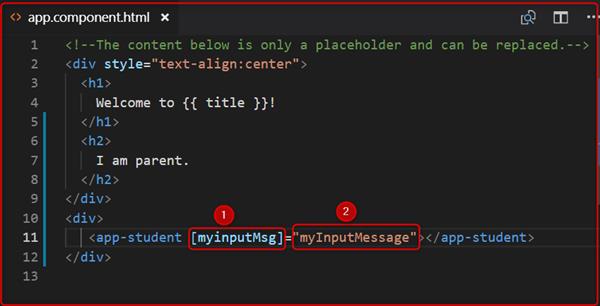
In the above image, represent 2 points. Let's explain each and every points.
1. Denotes those variables which will use by child component (student component) with @Input decorator to fetch the message from parent component and
2 denotes those variables which are passed the parent component message to child component.
Now open the child component's .ts file (student.component.ts) and import Input decorator, use the myinputMsg variable with @Input decorator and print it inside constructor or ngOnInit() like.
import { Component, Input, OnInit } from '@angular/core';

@Component({
selector: 'app-student',
templateUrl: './student.component.html',
styleUrls: ['./student.component.css']
})

export class StudentComponent implements OnInit {
@Input() myinputMsg:string;

constructor() { }

ngOnInit() {
console.log(this.myinputMsg);
}

}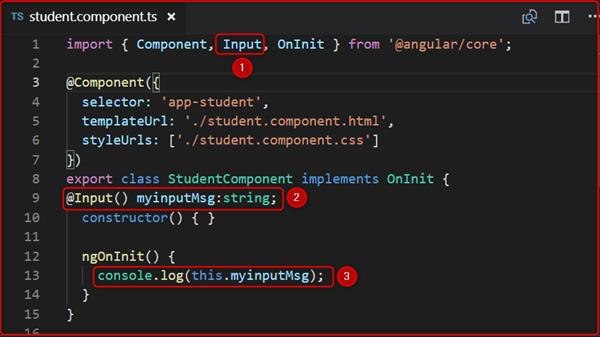
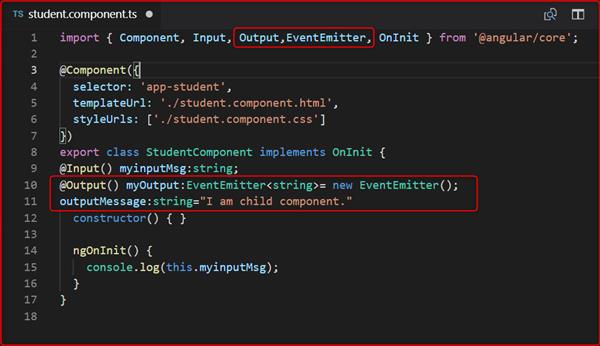
In image 4, represent 3 points. Let's explain each and every points.
1. First import the Input decorator which is provided by angular and full path is @anuglar/core.
2. Use @Input decorator and declare those variables which are passed by parent component Html(app.component.html) file's point 1. When we declare those variable (myinputMsg) with @Input decorator it automatically fetches the value of the parent component variable with the help of @Input decorator.
3. Print values of this variable inside constructor or ngOnInit(). We have used inside ngOnInit().
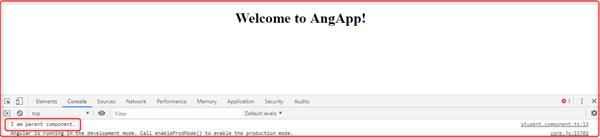
Let's output:
@Output Decorator:
@Output decorator is used to passing the data from child to parent component. @Output decorator binds a property of a component to send data from one component to the calling component. @Output binds a property of the type of angular EventEmitter class.
Transfer the data from child to parent component we use @Output decorator.
Lets's Open the child component' .ts file (student.component.ts).
For use the @Output decorator we have to use import, two important decorators they are Output and EventEmitter.
EventEmitter:
Use in components with the @Output directive to emit custom events synchronously or asynchronously, and register handlers for those events by subscribing to an instance.
import { Component, Input, Output,EventEmitter, OnInit } from '@angular/core';Now, create any variable with @Output decorator.
@Output() myOutput:EventEmitter<string>= new EventEmitter();here in the place of string, we can pass different types of DataTypes.
After that create a variable to store and pass the message to the parent component.
outputMessage:string="I am child component."Code:
import { Component, Input, Output,EventEmitter, OnInit } from '@angular/core';

@Component({
selector: 'app-student',
templateUrl: './student.component.html',
styleUrls: ['./student.component.css']
})
export class StudentComponent implements OnInit {
@Input() myinputMsg:string;
@Output() myOutput:EventEmitter<string>= new EventEmitter();
outputMessage:string="I am child component."
constructor() { }

ngOnInit() {
console.log(this.myinputMsg);
}
}
Now we want to send the value of output message to the parent component. Then we create a button and click on this button we will send the values to the parent component.
Let's open the child component Html page and create a button and click event of this button we send the values.
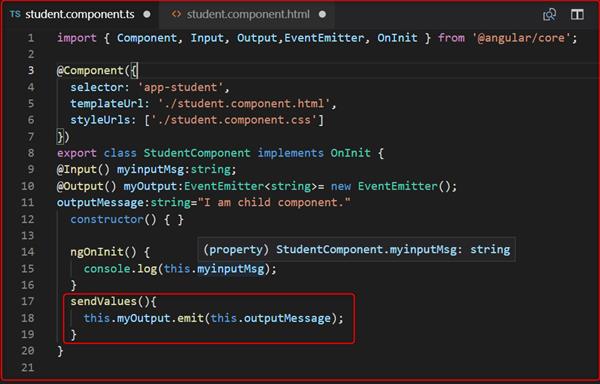
student.component.html:
<button (click)="sendValues"> Send Data </button>Now fire the click on student.component.ts.
sendValues(){
this.myOutput.emit(this.outputMessage);
} 
Now for fetch the value we have to go app.component.html file and use the below code.
<app-student [myinputMsg]="myInputMessage" (myOutput) ="GetChildData($event)"></app-student> 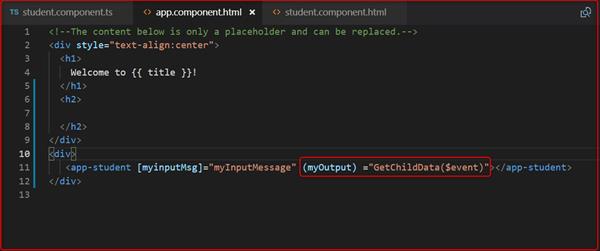
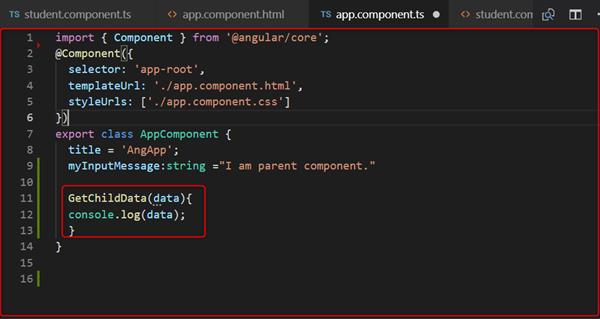
Now create a function which is GetChildData() on parent component' .ts file, for fetch the data from child component.
Open the app.component.ts:
Code:
GetChildData(data){
console.log(data);
}
Output:
Now run the application and click on the Send data button after clicking this button it fetched data from the child component.

Conclusion: In this article, we have learned how to pass data from parent to child component and vice versa, and which decorators are more responsible for done this task which called @Input() and @Output() decorator. I hope it will help you.
