


How to store images in database using Ado.net
We already know that C#.net could be used to develop various multitasking windows form applications. Here we’ll develop one such application. This application will enable us to aggregate images maintaining a database. The images would securely be stored into the database connected with the application even if they have been deleted from the system. We used Ado.net to generate a connection between the Image locker application and the database.
STEP 1: We open a new windows form application in Visual Studio.

STEP 2: A new Form opens up in the application. We customize the form according to the functionality of the application.

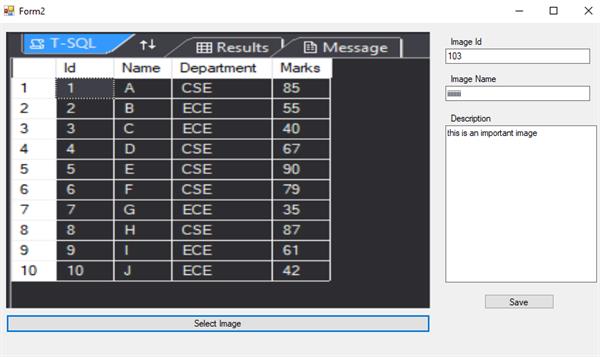
We added a number of controls from the toolbox. Toolbox could be found from the ‘View’ option appearing in the topmost menu bar. We dragged and dropped buttons, textboxes, and a picture box. Three text boxes are added to take the input from the user in the form of image Id, image Name, and description. Two buttons are added to select images and to save the image respectively. The picture box plays a significant role in the application as the selected image appears inside it.
STEP 3: As we require our application to maintain connectivity with the database, we add the connection string in the app.config file. We can find the app.config file in the solution explorer. The app.config file represents the application configuration file. Connection string represents the path or the location where the database is actually present.

STEP 4: A new class named ‘sqlhelper’ is added to the project. The code within this class is given below.
using System;
using System.Collections.Generic;
using System.Linq;
using System.Text;
using System.Threading.Tasks;
using System.Configuration;
using System.Data;
using System.Data.SqlClient;

namespace Ado.net_project
{
    class sqlhelper
    {
        public string Connectionstring
        {    get
            {
                return ConfigurationManager.ConnectionStrings["db"].ConnectionString;
            }
        }

        public DataTable Getrecords(string query)
        {
            SqlDataAdapter adp = new SqlDataAdapter(query, Connectionstring);
            DataTable dt = new DataTable();
            adp.Fill(dt);
            return dt;
        }

        public int Upload( Myimage image)
        {
            SqlConnection con = new SqlConnection(Connectionstring);
            SqlCommand cmd = new SqlCommand("insertimage", con);
            cmd.CommandType = CommandType.StoredProcedure;
            cmd.Parameters.Clear();
            cmd.Parameters.AddWithValue("@Id", image.Id);
            cmd.Parameters.AddWithValue("@Name", image.Name);
            cmd.Parameters.AddWithValue("@Desc", image.Desc);
            cmd.Parameters.AddWithValue("@PHoto", image.Photo);
            con.Open();
            int res = cmd.ExecuteNonQuery();
            con.Close();
            return res;

        }
    }
}
We create a function ‘Upload’ to upload the image within the database. The object of SqlConnection class is used to establish a connection between the application and the database. We created a stored procedure inside the database. As the input provided by the user will be an image along with the other details. So, it is essential to create a stored procedure. We cannot save the data other than text or numbers using an adhoc query instead, we have to use parameter=erased statements or stored procedures. We created a stored procedure name “insertimage”.
STEP 5: We added another class ‘Myimage’ to access the variables using the properties.

STEP 6: To provide the functionality to the buttons, we double click the buttons which opens up the event handler providing us block to write the code for the functioning of the buttons and various other controls.
using System;
using System.Collections.Generic;
using System.ComponentModel;
using System.Data;
using System.Drawing;
using System.IO;
using System.Linq;
using System.Net;
using System.Text;
using System.Threading.Tasks;
using System.Windows.Forms;
namespace Ado.net_project
{
public partial class Form2: Form
{
public Form2()
{
InitializeComponent();
}
OpenFileDialog op = new OpenFileDialog();
private void button2_Click(object sender, EventArgs e)
{
op.Filter = "JPEG Images|*.jpeg|PNG Images|*.png|All files|*.*";
if(op.ShowDialog()==DialogResult.OK)
{
pictureBox1.ImageLocation = op.FileName;
}
}
sqlhelper sql = new sqlhelper();
private void button1_Click(object sender, EventArgs e)
{
if (pictureBox1.ImageLocation != null && pictureBox1.ImageLocation != string.Empty)
{
Myimage img = new Myimage();
img.Id = Convert.ToInt32(textBox1.Text);
img.Name = textBox2.Text;
img.Desc = textBox3.Text;
img.Photo = File.ReadAllBytes(pictureBox1.ImageLocation);
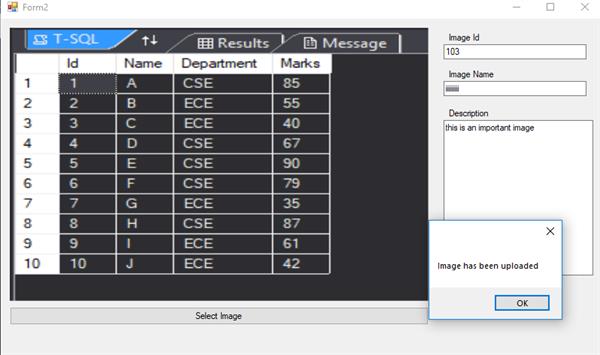
if(sql.Upload(img)>0)
{
MessageBox.Show("Image has been uploaded");
}
else
{
MessageBox.Show("server error");
}
}
else
{
MessageBox.Show("Select image First");
}
}
private void Form2_Load(object sender, EventArgs e)
{ DataTable d=sql.Getrecords("Select * from Imagelocker");
dataGridView1.DataSource = d;
}
}
}In the above lines of code, we used an object of OpenFileDialog to open files present in the system and select that particular image to appear in the picture box.
OUTPUT:-
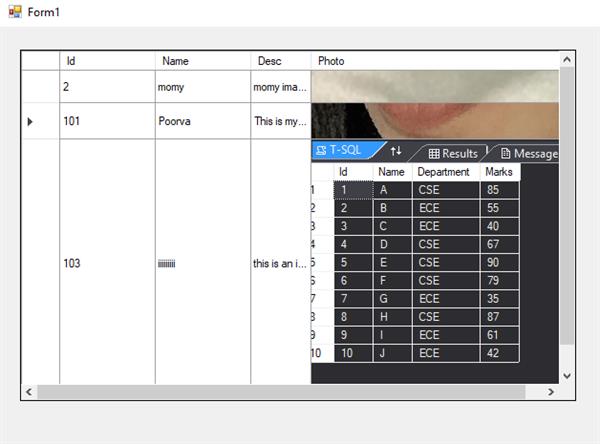
To check whether the data is saved within the table in the database, we dropped a DataGridView control and provided that particular table as the data source which was used to store the image details.
Finally, we got to see the inputs given by the user are securely stored within the database through the application