


How to create Blazor Model Classes ? | Blazor Tutorials
Before getting into this article, we would suggest you please read all our other Blazor articles for more and sequential information about ASP .NET Core Blazor with the links below:
- Chapter 1: Blazor Interview Questions and Answers
- Chapter 2: What is ASP.NET Core Blazor?
- Chapter 3: Blazor Vs Angular
- Chapter 4: Blazor hosting models
- Chapter 5: Project Structure in Blazor
- Chapter 6: What are Blazor Components
- Chapter 7: net core razor components in details | Nesting Razor Components
- Chapter 8: Blazor Model Classes
- Chapter 9: Data Bindings in Blazor
- Chapter 10: Data access technique in blazor
Making blazor model classes
As we progress through this tutorial we will fabricate Employee the board framework that permits us to Create, Read, Update, and Delete employees. Coming up next are the model classes we need.
Employee, Department, and Gender
// Employee class
public class Employee
{
public int EmployeeId { get; set; }
public string FirstName { get; set; }
public string LastName { get; set; }
public string Email { get; set; }
public DateTime DateOfBrith { get; set; }
public Gender Gender { get; set; }
public Department Department { get; set; }
public string PhotoPath { get; set; }
}
// Gender Enum
public enum Gender
{
Male,
Female,
Other
}
// Department Class
public class Department
{
public int DepartmentId { get; set; }
public string DepartmentName { get; set; }
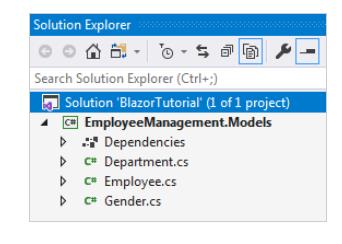
}Make Blazor Model classes
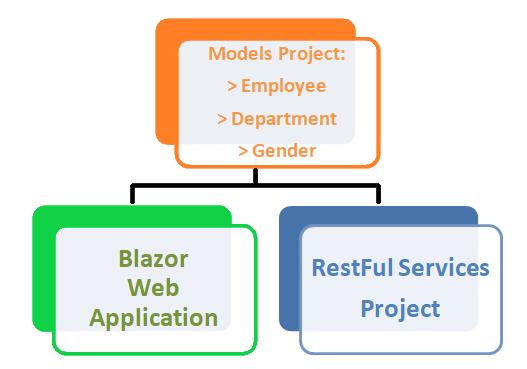
Make another .NET Standard Class Library venture. Name the venture EmployeeManagement.Models. Name the arrangement BlazorTutorial. On the off chance that you are asking why we picked a .NET standard class library venture. All things considered, it permits us to reuse these models in a wide range of task types over the .NET environment.
We will utilize these models in a Blazor web application venture. As we progress through this course we will make ASP.NET center RESTful administrations. These administrations give the information our Blazor venture needs. Indeed, even in the RESTful administration venture, we will utilize these model classes.
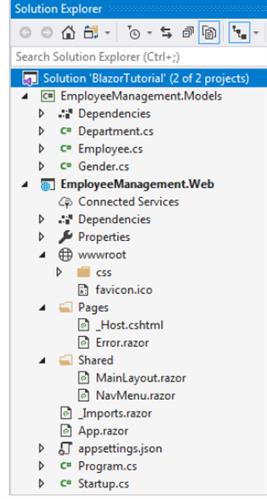
Make Blazor Web Project
Include another Blazor worker venture, to the BlazorTutorial arrangement Name it EmployeeManagement.Web. This is the web application venture that permits us to Create, Read, Update, and Delete employees. This undertaking needs the model classes we made previously. So add a reference to EmployeeManagement.Models venture from EmployeeManagement.Web venture. Right snap and make EmployeeManagement.Web the startup venture on the off chance that it isn't the beginning up the venture as of now. Erase the accompanying documents and organizers from EmployeeManagement.Web venture.
- Information organizer
- Pages/Counter.razor
- Pages/FetchData.razor
- Pages/Index.razor
- Common/SurveyPrompt.razor
- Changes in Startup.cs
Remove the accompanying utilizing explanation
using EmployeeManagement.Web.Data;Expel the accompanying line from ConfigureServices() technique
services.AddSingleton<WeatherForecastService>();On the off chance that you are tracking, now your undertaking should look as underneath.
Make EmployeeList component
In EmployeeManagement.Web venture, right snap on the Pages organizer, and include another razor component. Name it EmployeeList.razor. It is this component that we will use to show the rundown of Employees. Remember the accompanying @page order for EmployeeList.razor record. This advises Blazor to deliver this component when we explore the root application URL.
@page "/"Changes in NavMenu.razor
Expel the accompanying 2 route menu things.
<li class="nav-item px-3">
    <NavLink class="nav-link" href="counter">
        <span class="oi oi-plus" aria-hidden="true"></span> Counter
    </NavLink>
</li>
<li class="nav-item px-3">
    <NavLink class="nav-link" href="fetchdata">
        <span class="oi oi-list-rich" aria-hidden="true"></span> Fetch data
    </NavLink>
</li>
Employee list blazor component
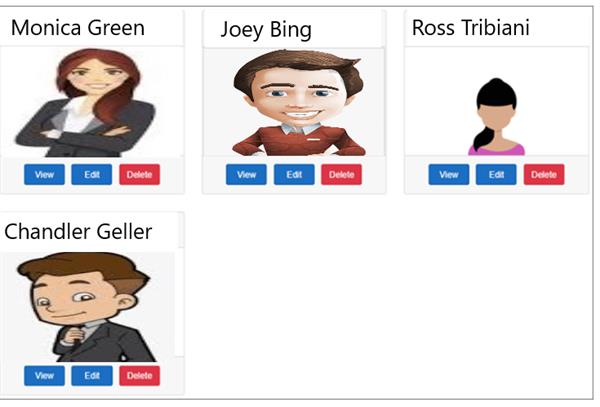
Presently we will talk about actualizing our first blazor component - EmployeeList component. We need this component to show the rundown of employees as in the picture beneath.
// EmployeeList.razor

@page "/"
@inherits EmployeeListBase

<h3>Employee List</h3>

<div class="card-deck">
    @foreach (var employee in Employees)
    {
    <div class="card m-3" style="min-width: 18rem; max-width:30.5%;">
        <div class="card-header">
            <h3>@employee.FirstName @employee.LastName</h3>
        </div>
        <img class="card-img-top imageThumbnail" src="@employee.PhotoPath" />
        <div class="card-footer text-center">
            <a href="#" class="btn btn-primary m-1">View</a>

            <a href="#" class="btn btn-primary m-1">Edit</a>

            <a href="#" class="btn btn-danger m-1">Delete</a>
        </div>
    </div>
    }
</div>
Code clarification
Blazor components have a few life cycle techniques. OnInitializedAsync is the most widely recognized life cycle strategy. We are superseding this technique to recover Employee information.
@page "/"
@inherits EmployeeListBase

The single forward slash in the page directive specifies to render this component when we navigate to the root application URL.
@inherits attribute specifies the base class for this component.
<div class="card-deck">
@foreach (var employee in Employees)
{
<div class="card m-3" style="min-width: 18rem; max-width:30.5%;">
<div class="card-header">
<h3>@employee.FirstName @employee.LastName</h3>
</div>
<img class="card-img-top imageThumbnail" src="@employee.PhotoPath" />
<div class="card-footer text-center">
<a href="#" class="btn btn-primary m-1">View</a>
<a href="#" class="btn btn-primary m-1">Edit</a>
<a href="#" class="btn btn-danger m-1">Delete</a>
</div>
</div>
}
</div>Each employee is displayed using a Bootstrap card. To loop through the list of employees we are using a foreach loop
// EmployeeListBase.cs

using EmployeeManagement.Models;
using Microsoft.AspNetCore.Components;
using System;
using System.Collections.Generic;
using System.Threading.Tasks;

namespace EmployeeManagement.Web.Pages
{
    public class EmployeeListBase : ComponentBase
    {
        public IEnumerable<Employee> Employees { get; set; }

        protected override Task OnInitializedAsync()
        {
            LoadEmployees();
            return base.OnInitializedAsync();
        }

        private void LoadEmployees()
        {
            Employee e1 = new Employee
            {
                EmployeeId = 1,
                FirstName = "Monica",
                LastName = "Green",
                Email = "monica@tutorialslink.com",
                DateOfBrith = new DateTime(1980, 3, 6),
                Gender = Gender.female,
                Department = new Department { DepartmentId = 1, DepartmentName = "Finance" },
                PhotoPath = "images/monica.png"
            };

            Employee e2 = new Employee
            {
                EmployeeId = 2,
                FirstName = "Joey",
                LastName = "Bing",
                Email = "Joey@tutorialslink.com",
                DateOfBrith = new DateTime(1991, 10, 02),
                Gender = Gender.Male,
                Department = new Department { DepartmentId = 2, DepartmentName = "HR" },
                PhotoPath = "images/joey.jpg"
            };

            Employee e3 = new Employee
            {
                EmployeeId = 3,
                FirstName = "Ross",
                LastName = "Tribiani",
                Email = "Ross@tutorialslink.com",
                DateOfBrith = new DateTime(1989, 04, 04),
                Gender = Gender.Female,
                Department = new Department { DepartmentId = 1, DepartmentName = "IT" },
                PhotoPath = "images/mary.png"
            };

            Employee e4 = new Employee
            {
                EmployeeId = 3,
                FirstName = "Chandler",
                LastName = "Geller",
                Email = "Chandler@tutorialslink.com",
                DateOfBrith = new DateTime(1982, 9, 23),
                Gender = Gender.Male,
                Department = new Department { DepartmentId = 3, DepartmentName = "Payroll" },
                PhotoPath = "images/Chandler.png"
            };

            Employees = new List<Employee> { e1, e2, e3, e4 };
        }
    }
}
Blazor segments have a few life cycle strategies. OnInitializedAsync is the most widely recognized life cycle technique. We are superseding this strategy to recover Employees information. Right now we have Employees information hard-coded in the component. As we progress through this course we will talk about how to recover this information from a database by calling a RESTful help.
// MainLayout.razor

For styling, include Boostrap container class on the <div> element that contains @Body

@inherits LayoutComponentBase

<div class="sidebar">
    <NavMenu />
</div>

<div class="main">
    <div class="content px-4 container">
        @Body
    </div>
</div>
// Site.css
.imageThumbnail {
height: 200px;
width: auto;
}Download and remember the accompanying images you want to use in wwwroot/images folder.
